Saturday, February 25, 2012

Eggless chocolate cake.


I wanted to share this recipe.
 I had a bad craving for chocolate cake but I didn't have any eggs - or so I thought!
This was really yummy only I made a few modifications because I didn't care if it was low calorie I just wanted yummy chocolate!!


It is a heavy dough and needs to be cooked longer. It's a bit more like a pudding.

You will need:

approx 150grams margarine
1 cup of sugar
5 tablespoons of applesauce
vanilla essence

2 cups of SR flour
2 teaspoons of baking soda
1 tablespoon of cornflour
1/2 cup of cocoa powder

Method:

place marg in mixer on high add sugar till smooth
add apple sauce 1 spoonful at a time till blended

sift dry ingredients in a separate bowl

put mixer on low speed

add dry ingredients on spoonful at a time or flour will go everywhere as I learn from experience!! :)
Give each spoonful time to mix in as the mixture appears dry at first but soon mixes to a wet dough.

Place mix in a lined tin and bake for 35 -45 mins till skewer comes out clean.

Note!
My cake was a little dry and the above was how I made it. I would suggest another 1 or 2 teaspoons of apple sauce or cook it for 5 - 10 mins less depending on your oven.
This is a really sweet recipe. Applesauce was used as a substitute for butter and sugar to make the recipe healthier, in the recipe I was using as a guide. Here is the link.

Very different you'll see. Make sure you read the comment down the bottom for how to improve it.
I might try the healthy version next time.


I was happy to just get a chocolate fix!! So yum with ice cream!


Eyelet yoke cardigan - Finished!


At long last I finally completed my cardigan!

 I'm so happy it's finished!

I worked on it mostly during my lunch breaks at work, ignoring a few odd looks and comments but I wont let that stop me doing what I enjoy. Not everyone understands the joy of creating or the addiction of knitting!

I chose this pattern for the simple patterned yoke to improve my skills. I haven't done a patterned project for a few years. I was concerned the end result would look a bit old fashioned so I chose Lincrafts Splendour yarn to attempt to jazz it up a bit.

I am happy with the end result and I feel the star button helps to make it look more modern.

The pattern is a Lion brand Yarn Company free pattern 


I thought I didn't have much to go at this point. Ha ha. Wasn't even half way through!
I'm sure I could have done it in just over a week if I worked on it every day but life gets in the way.


The pattern starting to take shape!!


Getting exciting now!


starting to look like a cardigan!


This is when I thought it was hard.
 I had nearly 200 stitches and I'm used to having under 100!
 I struggled with the K 2 before the YO.
I couldn't get my needle through all the loops without picking up a foreign loop.
 I also had a minor issue with my yarn pulling and then having big fat pieces that didn't sit well in the patterned sections. There is a big red bit in the front of the yoke. Suppose that's what you get when you buy wool on sale!

 I ended up with a dropped stitch.
 I'm not sure which issue cause it but I was able to fix it after I had finished. It's pretty hard to find the fault now. 

This is all the knitting completed. Now to assemble it!! Yay!


No not 4 arms!!


Pretty cleaver!

And even better there were only 2 seams to sew!

All that hard work paid off!!


All finished!!!


 I'm much happier than I expected to be! Now I just need some one to model it for me!!
Not sure if I can part with this one!


Friday, February 17, 2012

Vegies update.

 I have some really exciting news!!
My tomato plants had flowers on them and I thought that was exciting enough but before I knew it they had tomatoes growing on them!!!!! I am so excited!


They are still small but it wont be long now.


Here they are up close. So excited!!


The leaves on my plants have gone a bit brown on the edges. At first I thought it was a bug but I think I may have watered them with seaweed solution on a hot day and it has burnt the leaves. I have to be more careful to only water the stems and soil. Avoid the leaves. Hopefully it will fix it's self in a few weeks.


This is my plant I separated into it's own pot. I'm not sure if my memory is bad but I swear it was half that size this morning!! We had mixed weather and lot's of rain and now a beautiful sunny day and it's shot up!!


My beans are proving to be a challenge. They have a big beautiful butter beans on one plant but now the plant has turned yellow!! It does not look happy. This happened last time they had beans on them.

 During the week I looked on the leaves and found a mark like something was tunneling insde the leaf and today I found my enemy! Spider-mites!!! Nooo!!! I hate you spider-mites!! I had them last year and they were so hard to get rid of.

I've just treated them with white oil and crossed my fingers today is not too hot to have sprayed. Hopefully that will fix them.

 Growing vegies is expensive. Does anyone have a cheaper solution? Most solutions in the shops are around $10 a packet/can. I hate using chemicals on them because then I'm scared to eat them but I don't know what else I can do...... Persist,..... I will. 

I originally wanted to grow vegies to spend less money and to know where they have come from but I'm starting to wonder if it's financially worth it when you are feeding one! 
Hopefully when I work out how to grow the vegies well I will see the benefits.


Sunday, February 12, 2012

Apple and sultana bread

Today was supposed to be sock monkey making day but that didn't happen. Too many other more important things to do before the working week gets going again.

So what did I do? 
I made more bread. 
I also mowed the lawn, cleaned the whole house, filled some pot holes in my driveway after all the rain we've been having, made dinner for my boyfriend and had a go at making chocolate brownies.


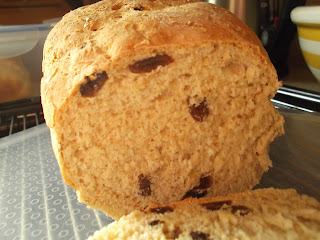
Again I made a white loaf and this time I made a sultana and fresh apple loaf.


I really like how it looks


I used 1.5 cups of white flour and half a cup of wholemeal flour and added a handful of sultanas, grated half a fresh apple and added some cinnamon and mixed spice at the dry flour stage. Wasn't sure if it would work with the moist apple in it.


But it turned out really well. It's a bit heavier than my white loaf and has a sweet, moist taste. 


I really like it.


These are the brownies I tried to make. Not exactly moist.
It was supposed to be gluten free and free of a lots of things except egg, which is the one thing I shouldn't have!! So I substituted with extra milk. Normally this works but I also guesstimated most of the quantities because my scale is on the blink and the recipe was all in grams!! What ever happened to a cup of this and a teaspoon of that!!


I'll have to try it again with the correct quantities. I'll give the recipe when I get it right!!
It still taste good but I am chocolate deprived at the moment!!


Friday, February 10, 2012

Baby hat day


Well this morning I got up early and made my bread for the week and then because it was raining it was a Sewing day!!


Today was going to be the day I had a go at making sock monkey's but it turned out to be a day I'd make Baby Hat's!!

I was looking through my fave blogs and found a great pattern I just had to have a go at.

 I used recycled materials in this project. A suggestion from my Hard work Heaven man. I didn't want to make them too girly because I'm not sure if they are for a baby boy or a girl. 


I was going to use my partners shirt's (he he) but decided the colours weren't nice enough so I had to sacrifice my own shirts!! They didn't fit properly and at least I didn't have to fork out any extra cash!


These are the two hats cut out


The end result of my first hat. Pretty quick to whip up but I don't have an over locker and this wasn't quite the nice result I was hoping for. I also wasn't pleased that you could see the seams inside the hat.


This is my attempt at adding a lining. Bit harder to do at this stage.


Looking a bit better now and the inside is also softer.


Much better


At least this time I know I need a lining so I can preplan how to do it.


Much nicer this time and a novelty knot tied at the top to at some personality.


Or without the knot


Fully reversible


My two finished hats. Much happier with my second hat.

 I think tomorrow might be a sock monkey kind of day!

Wednesday, February 8, 2012

Mad hatters bucket hat


I need to wear a hat at work but when my hair is up, the average ladies hat doesn't fit my big boof head!! My hair ends up all messy.

I thought I'd have a go at making my own bucket hat.


I had so much trouble!
I thought at first it would be easy. - Just measure my head and the rest will fall into place. - How wrong was I?!!!


After wasting most of my time trying to Google a hat pattern or some helpful advice I finally bought my favourite magazine Homespun,which just happened to have a bucket hat pattern!!! What a great excuse to buy it!!


Now you would think this was the end of it, but NO!
Because I am so impatient and found the pattern more complected and more time consuming that first expected I decided
"Bugger it! I'm gonna go with my first idea and wing it!!"
I warn you I have done this once only!! You may need to make corrections as I am no expert!!


Do not use expensive material and expect this to be perfect!!
You may need to use some of your own sewing knowledge to get this to look the way you like it.


So this is how I did it.

I measured my head, with my hair up, how I wear it for work. I then traced a circle plus approximately an eye balled 1cm extra for seem allowance.
I carefully cut the hat top out leaving a 4-5 inch circle of material for the brim in the excess material as you can see above.
The centre is the exact size of the hat top we just cut out. So be careful cutting it out!!


I would allowed 1 meter of each type of material as I used a fat quarter of purple and didn't have enough. That way your safe to stuff up!
I made the part that goes around my head between the top of the hat and the brim (don't know what it's called.) the circumference of my head plus 1 cm for seem allowance. Lets call it the strip.


Then I repeated all of this on a different fabric so I could reverse the hat for a different look.
This time I made the strip in two colours for some contrast and because I didn't have enough material to do it in one colour!
I just sewed the two materials together so they measured the same width as the first strip. Mine was 62cm by 10cm. The average head is about 57cm in most patterns, so allow extra for seam allowance.
Sorry I know these are terrible instructions!! Just cut it bigger than you need it so you can cut it to size! 


Next cut some interfacing. 1 piece of interfacing for each shape. So 3 pieces of interfacing in total.

I ironed each piece of interfacing to each of the purple pieces then cut to make sure the interfacing did not over lap the material. So you should have:

2 hat tops - mine was 20cm diameter 1 purple 1 blue
2 brims - mine was roughly 4-5 inches wide 1 purple 1 blue
2 strips -mine was 62cm long by 10cm wide 1 purple and blue the other blue.
Each of the purple pieces with interfacing ironed onto the wrong side.  
Now if you are organised more so than me you could layer your materials so you can cut each of the shapes once!
Next sew the purple strip material together at the short ends right sides together.
Pin and sew the hat top to the strip. I found this quite tricky.
Repeat with the contrast colour material. 
With right sides together and one hat top, inside the other hat top, sew raw ends together leaving an opening to pull out the right sides. 
Now sew the brims together with right sides together on the outside, larger circumference only.
Turnout to show right sides, ensuring the edge you just sewed is neat by poking it out and folding the interfacing down with your finger tips. 
Run a line of the largest stitches on your machine around the inner brim of the hat and pull the stitches up evenly to fit base of the hat top, giving a wavy look to the brim.
Sew the hat and the brim together, matching colours together, approx 2cm up from the hat strip's, raw edge.
This will allow you to turn the neat hat strip edges over the raw edges of the hat brim and sew down to give a neat finish. 
Cut any stray threads. 

 This hat is not perfect but I still think it looks great. Not exactly what I would wear at work but the kids think it's fun!!
My gathering is all uneven and next time I would make the hat top smaller and make sure the brim inner edge is the exact size as the hat top edge. I would also consider not using interfacing at all depending on the fabric I choose.


Now hat is finished and you can look as silly as me!! 


Friday, February 3, 2012

Vegies continued!


Thursday night I finally separted the tomato plants in the orange pot. 


These are the plants I removed!
 I took them to school with me and I planted them with the 2 year old kids. The children took a surprising interested. I wasn't worried if they didn't want to participate but they all came and watched.
 I like children to learn about life's essential skills as early as possible, having grown up on a farm myself. It's great to get dirty!


This one I potted separately. We'll see how it goes.


And this is my sad, sad pot after I removed the plants!!
I think they need some TLC!


These are my tomatoes that have already been separated. 
Hopefully the orange pot will resemble this in time!! 
Look how big they've gotten!


And They have flowers!!
 I'm so excited. Looking forward to eating my own tomatoes!!